Category Archives: Rolling Stock

Freight Car Friday #4…

This edition of freight car Friday was two weeks in the making, so I apologize about missing last week. Things kind of piled up on me and I ran short of time. That, and this weeks car was not a casual 1 night project.

This week I present to you – a Custom Rail 89′  C&NW Bi-Level Auto Rack, part #4382. There was no notation of which year this was made and a quick check of the “Google” did not reveal anything. In fact I came up with very little info other than it represents a early 80’s auto rack. And they did not seem to be very well received. In fact the quote I came across in a review was as follows: “The Custom Rail cars were based on the old Custom Rail 89′ flat car which the whole kit was not all that user friendly to build and in all my travels I’ve seen few assembled examples so they didn’t seem to go over well.”

Wow.

Had I read that before starting the kit it may still be sitting on the shelf waiting to be built. And, that description was rather accurate in retrospect.

The kit could be built as just an 89′ TOFC flat. It has all the pieces for that. Or you can build it as the intended enclosed auto rack. Additionally as the individual metal panels are applied to the side frames, I believe you could probably build it as an open auto rack as well. Also, since the panels are applied separately the etched metal panels from Plano Model Works might work and give the car a far more “open” feel. In which case you could then place scale cars on the rack and be able to see them inside.

Anyways on to the model. As I said the side panels are separate from the side frames and need to be glued on.

Prepping the first side for assembly.
Side panels glued in place.
Assembled panel from the outside.

Having done this I ran into the first”fussy” part of the build. You are to glue the second deck on to the inside of the side frame. There are very slight indentations marking where they go. In fact they are so slight that I tried to take a picture of them but they really didn’t show up. My fix, though a bit heavy handed, was to glue a strip of .100 x .100 styrene to the inside just above the indentations. And then glue the deck to the side and the styrene strip.

Reinforcement for the second deck.
Second deck glued to side and reinforcement.

This was not at all noticeable from the outside.

Outside view of side panel. Reinforcement strip does not show.
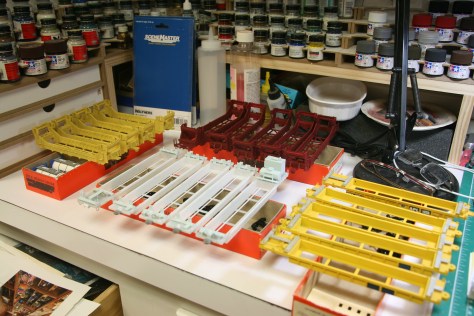
Two side panels glued to center deck ready for attachment to main deck and roof.

Next was the base deck of the flat car. The basic assembly is pretty straight forward. There is a stamped flat sheet weight that is glued on to the bottom (it was painted TTX yellow to match the underside) with the center sill glued on over it. The brake equipment is glued into place, although the is no marked location, you just work from the diagram as to where they should be.

The swing couplers are the big hang up. Things are kept pretty tight for prototypical appearances. Meaning that there is a very narrow cutout at the end of the car for coupler movement. Having doubts, I did a basic assembly to make sure there was enough swing for my 30″ radius  curves. That is how little swing there is. They worked though I’m not sure how much smaller a radius curve they would work on without modifying the underside of the car. Also, I did quite a bit of sanding/filing to get things to move freely, so that they could get around the curves.

The finished basic flat.

The main deck of the auto rack. could easily be finished as a 89′ TOFC.

Then it was time to mount the enclosure to the flat. There are only the base of the upright supports that make contact with the deck. Additionally these are close to scale thickness, so the contact surface is very small. It took time and patience as you worked you way down one side then the other.

Assembly finished, ready for decals.

One side note, I did not install the outside break levers to the side. The diagrams did not match anything on the parts sprues and nothing looked like what was on the Walthers model that I had on hand. So better then throwing something on that looked funny, I left it off.

Then it was time for decals. The decals were made by Microscale. However, the instructions are so poor and blurry that placement was totally unreadable. Luckily I had a Walthers C&NW car that I used for reference.

Assembly finished with Walthers C&NW Auto Rack behind it.
Decals applied and ready for revenue service.

I needed to add 1 1 /4 ounces to weight to the car and it received Kadee couplers. Metal wheels will have to wait till I can round up 28″ wheels.

It was a bugger to build but the finished car is nice. If you find one around I would recommend it, but know what you’re getting into.

That’s it for this week, till later…

Freight Car Friday #3…


Today for Freight Car Friday I assembled a Walther’s Single Bay Airslide Hopper #932-4611. The kit is from 1990.

Walther’s Airslide Hopper from 1990.

I like these cars as the little Airslides were some of the first covered hoppers used by the railroads. The 2600 cu ft hoppers were introduced in 1953 by General American Transportation Corp. (GATX). They were used to transport dry, granular or powdered commodities.

Compared to it’s bigger brother which was last weeks freight car, this one was a far more involved build. Whereas the PD hopper from last week has basically the same look/equipment, this one has a higher piece count. Case in point would be the top loading hatches. Most of the previous kits that I have built with top loading hatches, they have everything molded together.

On this kit the top hatch consists of four pieces, the round hatch and three retaining bolts. The bolts are molded more as long pins that push between fingers on the hatch and then into a hole on top on the car. Nothing wrong with this and not a problem while assembling the kit. It just made for a more involved build. Fortunately for these aging eyes, they included extra small parts in the kit.

It also got the Kadee’s and metal wheel sets. The weight was almost spot on to the NMRA recommended practices. I only added a 1/4 ounce to bring it to weight.

Again, much like last weeks build, this one was a nice, relaxing build. Though not available from Walthers anymore, you can find them readily available on secondary markets.

Till next week, take care and stay safe..

Intermodal Update #1…

As I left it in the Intermodal Cars post I was trying to figure out paint. To update you as to where I’m at with that, I’ve got something that will work.

I probably had not mentioned that the decals that I gotten for the cars were: SeaLand and TTX for the Gunderson Twin Stacks. And APL (American President Lines) for the Thralls. One set of the Thrall well cars are TTX yellow. And the other set is the powered set done in a red.

PPW/A-Line’s recommendation for the red for both the SeaLand and the APL powered set is a  50/50 mixture of Floquil Daylight Red and SP Scarlet. I could find neither one. Now I have paint in the shop in two places. One is in the racks on the workbench. These are colors that I use all the time. The other spot is a drawer that has paints that I bought but never had a use for. I’m sure I thought I did at one time.

Turns out in that drawer was a bottle of Pollyscale TTX yellow. It also had a bottle of Pollyscale Lehigh Valley Cornell Red. The red is awfully close to the photo colors of the Sealand well cars that I could find. It could be why I own it.

I should mention real quick. I got the grab irons that I needed for the other Thrall well car set. Went to mount them and broke the only #80 bit that I had left. Ordered more bits, so this set will wait.

As I had said before one set of the Thralls had been painted. So the Gundersons headed off for the spray booth. Gave them a coat of primer, waited 24 hours and then gave them their final color.

Gunderson Twin Stack well cars in the paint booth.

When they were dry they came out onto the workbench with the other well cars to await decaling.

Well cars awaiting decals. The unpainted ones are waiting for new drill bits for the grab irons.

Up next, adventures in mass decaling. Till then…

Freight Car Friday 2…

For this weeks freight car Friday I have a couple of hopper cars from Walthers.

They are models of Trinity Industries’ Power-Flo pressure differential covered hoppers. The cars are from 1994 and are models of the Trinity demo car, Walthers #932-5807 and a Grace Industries chemical car, Walthers #932-5803.

Walthers Pressure Differential Covered Hopper from 1994.
Project of the week, a Walthers Pressure Differential Covered Hopper from 1994.

The cars are pretty straight forward. A long rectangular box makes up the core of the car and the rounded sides are added to complete the hopper portion of the car. When adding the rounded sides one does have to be careful with the glue. To much and it will show and ruin the looks of the car. The brake hardware is added to the “B” end. And then the pressure piping for loading / unloading is added to the bottom. And of course the roof walkways.

The only fussy part was adding the piping to the bottom. One set simply goes into holes on the bottom of each of the five hopper bins and there is a second pressure pipe the fits into slots in the cars side frame. Then the individual pipes are glued to the bottom of each bin (no holes or location marks) and the end is bent to match up to the other pipe. That was the one that was fussy.

Once together Kadee couplers were added as well as Intemountain metal wheel sets.

Like I said, nothing splashy or time consuming. In fact the two of them made for a nice relaxing evening.

That it for now, will see you again next week. Stay safe…

And now, Freight Car Friday…

I am starting a weekly update, Freight Car Friday. Nothing profound, just thought I would highlight the kits that I am putting together while I wait for other things to dry / set / orders from suppliers to arrive.

All the kits are from forever ago – late 80’s through the early 2000’s. Much like the well car kits. Most are basic assembly type kits, think Athearn Blue Box. I didn’t think I had anywhere near as many unbuilt kits as I am finding. Who am I kidding, I’m a model railroader and we’re natural born kit hoarders. In fact I was recently in the LHS and thought about picking up another bulk pack of Kadee couplers and figured there would be no way I would need that many.

The other thing you may have noticed or will is that everything is newer than the current era on the layout. That is because until Bachmann  came out with their Spectrum line, steam was just too expensive. Athearn followed as did Broadway Limited and Life Like. When this happened I rather quickly made the change over to the transition era.

I find building freight car kits to be a nice diversion from other things. They generally go together quick and upgrades can be made if so desired. The basic “adds” are adding Kadee couplers to the cars. I have just recently added to that list metal wheel sets from  Intermountain.

All cars are now getting metal wheels. They are from Intermountain.


And the first car is…

First up are a couple more Walthers 72′ centerbeam cars I dug out. They are Walthers #932-24129 from 2003. The loads are Walthers SceneMaster as they are made to snap into the cars. I added Kadee couplers and metal wheelsets. I also added the tie down cables by drilling holes along the top of the center beam at the indicated locations. Then I ran thread though the holes and then added the loads.

Close up of the added tie downs.
Adding the tie downs to the center beams for the lumber loads.

Once the loads were in place I stretched the thread down to the corresponding ratchet and super glued it into place. Then moved on to the next one.Once I finished a side I carefully cut each thread off as close to the ratchet as possible.

Loads added and the tie downs in place. New wheels and Kadee couplers added.
Alternate view of the centerbeams.

And then (will weather later) they were ready for the layout. That is when the railroad shifts back to a more modern time.

I will have another quick project for next Friday. Another post on general projects on the layout is in the works, although I’m not sure what. I have pretty much been bouncing around on things. The thought process on what to work on has been a lot like a squirrel in traffic.

Till then, stay safe and Happy Railroading…


Intermodal Cars…

The one project that has been hauled out and put away the most have been the intermodal cars. These kits are from Proto Power West, now Proto Power West/A-line/Arrow Hobby. I have two sets of Gunderson Twin Stacks and two sets of Thrall well cars. A set would be a five car set( although somewhere over the years I have “misplaced” one of the intermediate cars for the one of the Gunderson sets ).

I bought these sets somewhere in the neighborhood of 30 years ago. They are no longer available new but can be picked up on the secondary markets. You can also pick up parts for them new on the PPW-Aline website.

When building the kits you can build as basic cars or if you want highly detailed cars, complete instructions for super detailed cars are provided. The basic assembly on the Thrall cars are merely adding the walkways and the brake equipment to the well bodies. The Gundersons need to be fully assembled ( sides, ends, car bottoms, walkways and brake equipment ) for basic assembly. I had done a basic assembly on one of the Thrall sets and had painted them with rattle cans. The paint is a bit heavy, but I decided not to try and fix it. I had also done a basic assembly on a Gunderson set but did not paint it.

The Gunderson well cars…

I started by doing the basic assembly of the other Gunderson set. Once together I started the extra detailing, doing the two like cars at the same time.

The Gunderson well cars awaiting detailing.

The finished yellow car is from a factory assembled/detailed set from A-Line/Intermountian. I had forgotten that I had the set, but it was nice to have for reference.

The extra detailing added to the Gunderson cars are:

  1. External brake piping along the outer side.
  2. Brake piping protectors over the lines.
  3. External brake rods and chains on the sides of the B and C units.
  4. Control rods for the container flippers.
  5. Stirrups.
  6. Grab irons.
A “B” end car with detailing done.
Close up of the detailing on the “B” end.
The Thrall well cars…

On the Thrall well cars there was more detailing to scratch build then on the Gunderson cars.

First I decided to make this set a generator set. The generator was there to provide power to refrigerated containers. This means the walkways between cars had to be reworked.

Then there was the basic brake piping added. Additionally there was a lot of styrene scratch building added. These included side sill reinforcement, reinforcement to the bottom of the cars, gussets added to the lift rings and the electrical connections between cars.

Labeling the ends of the well cars. At this point it makes no difference, but eventually it will.
Details added: Angle braces to the hoist plates, piping for the braking, well reinforcement along the top of the car, electrical connection on the end of car and reinforcement along the bottom of well.
Adding the super detailing to the well cars.
close up of piping and end of car. The added blocking over the coupler pocket was angled.
The kit details with the added scratch built details. The box would be for the electrical connection for refrigerated containers.
Alternate end of well car. The electrical connections evidently come in different shapes and sizes. Also added the angle brace to the hoist plate.

Also, stirrups were added and I would have added grab irons but I ran out and have to order more for the Thrall cars.

I didn’t realize it when I started this project that Plano Models has etched brass walkways and supports for both types of cars. If I knew they were available I would have ordered them. The fine detail would have made these cars really stand out.

Finished (kind of) and waiting for paint…

I ordered the grab irons and decided to line up paint. The problem is, thanks Rust-Oleum, that Testors has discontinued the whole Model Master line. This after they bought and then discontinued the Polly Scale and Scale Coat paint lines. I know that Vallejo has a wide range of colors, but as far as I know not railroad specific. And Micro-Mark now has railroad specific colors in their acrylic paint line but not much depth.

I shall wait for the grab irons to arrive and while waiting figure out my paint problem.

Till next time, happy modeling …


A Tale of Bulkhead Flats and Centerbeams…

First up is a set of loads for the bulkhead flats and a centerbeam that I have on hand.

First I should mention that these are something that I’ve had on hand for a very long time. I believe that they are from Jaeger HO Products (jaegerhoproducts.com). I went onto their site, but did not see the loads listed. Probably because the cars that they fit were the old Roundhouse bulkhead flats. Which is what I was fitting them to. The centerbeam is from Front Range. Also, no longer available.

The loads are wood blocks that a wrap is glued to. The wraps are almost like photos printed on paper. I don’t have any shots of them not wrapped as I had done that long ago. I just never had fitted them to the flats. Included are some balsa pieces for dunnage and blocking.

There is four different styles. The first is a block that is approximately 7/8″ H x 1 1/8″ W x 7 11/16″ L. The other three are only 9/16″ wide and work on the centerbeam style car or doubled up with blocking in between on the bulkhead flats. They vary in height from 1 1/4″ to 1 1/2″. The fourth style has several different heights.

I added the balsa strips on the bottoms and in between where applicable. They were then glued in place on the cars with canopy glue. As I have mentioned before I like canopy glue because it holds well and can be disassembled later if I want. I then used rigging thread for the tie downs.

After I finished the loads I looked at the cars and wished i had weathered them before loading. Undaunted I went ahead and weathered around the loads.

Here are the finished cars.

First set weathered and loads secured.
Second set weathered and loaded..
Weathered and loaded centerbeam.

I did have one more bulkhead flat than loads.

Weathered bulkhead flat.

Below a view not weathered and weathered.

Without weathering.
Weathered and loaded, need more tie downs.

Will have an update with another project real soon. Til then, take care and stay safe.

Odds And Ends…

Well, we are into the last half of March which means it’s been way to long since I last sat down here. It’s not that I haven’t wanted to, I just have not had the time. Also, except for a couple of specific projects, I would have said that I really hadn’t gotten anything done. But looking around the other night I realized that I have accomplished a few things. So, without further ado, lets get you caught up.

First up is a craftsman kit that I picked up 30+ years ago. It is a Quality Craft Models Kit. Quick history, Quality Craft made kits in HO until about 1980. I had picked this up at a LHS off of their consignment shelf. I had finally got around to finishing up the assembly about 2 years ago. It then went to the paint area where it got pushed to the back. Well, looking for something to do I finally painted it.

GATX #96500 tank car.

It is a model of GATX #96500. This is a 63000 gallon tank car, commonly referred to as a Whale Belly car. It was 98ft long over the couplers. The only commercial plastic kit was made by Atlas in N scale. All that’s left is to decal it. Small problem, I can’t find it’s box or the decals. That is the real problem with a long term project. I’ll keep looking, however if I can’t find them the instructions are full sized. I can scan them and make new decals on my printer.

Next up is New Brighton Yard. I Know! Talked about this for a long time.

The meat packing plant.

The yard in New Brighton.

As you can see it isn’t and never will be a classification yard. There is the meat packing plant, the dairy, power station and a yet as unidentified business. Plus some trackage to store cars on for these businesses.

I also finally got the programming track in and wired. It’s next to the staging track lead.

The new programming track in the fore ground.

Last but not least I continued on with the basic ground cover in Jackson. I am now up to Main Street.

Basic scenery continued.

Basic scenery done up to Main Street in Jackson.

I wasn’t sure what to do with the space up front that is bordered by the front grain elevator and the switching spur. It is a crescent shaped space. Thought about throwing in a crop field of some sort. But looking at it the shape made me think of the outfield of a ball park. Thus, the city of Jackson got their “Town” ball field. If you are unfamiliar with small town baseball, you should find one and go sometime. They are usually very nice ball parks. The games do start later as all the players have to finish work, go home and eat. Then they head down to the park for the game. They are a lot of fun.

The new ball field is in.

That’s what I have for now. Next time I will cover one of the “specific” projects I had mentioned. The other was an Epic Fail and right now we are not talking about it.

Till then…

Happy Halloween

Bev-Bel Halloween boxcar from 1978.

Happy Halloween to all out there. Pictured above is an old Bev-Bel Halloween car from 1978. For those who don’t know or don’t remember, Bev-Bel was a company that bought undecorated Athearn train cars and painted them for smaller rail lines or regional lines not produced by the major manufacturers ( Athearn, Roundhouse, etc.) They also made specialty cars like the  one above to celebrate the different seasons.


Addendum to 10/1/2014 post

As I was reading through my last post after publishing it, I realized that some may get the impression that I was going to run the railroad with about 70 railcars and a whole lot of engines. And cabooses.

The home road lettered cars that I talked about, the coal hoppers and boxcars, would be in addition to the other cars that I have lettered for other railroads. These would be the other railroads that operate in the upper Midwest and northwest that would interchange with the Continental Northern. Examples would be the Northern Pacific, the Great Northern, the Union Pacific, Soo line … you get the idea.

The number of home road cars that will eventually be on the layout has yet to be determined. Right now I have 30 hoppers lettered for the CN, but I know that I will need another 15 for basic operation. The 20 boxcars that I had mentioned is just a start. I have to get every thing out on the layout to see what I have. From there I will make sure the percentage of home road cars to “foreign” cars is right.

For those who don’t know, when a shipper sends something in a boxcar, for example, and the car is interchanged onto another railroad, the receiving railroad has to pay the home road for the time that the boxcar is on their line. The receiving railroad would then make sure that the car got to its destination as quickly as possible, was unloaded and sent on its merry way. Either back to its home road or loaded with something new and shipped of to a destination on some other railroad. That is why the greatest percentage of a type of car will always belong to the home road on a layout. And that is why I have to see what I have and then adjust so that I have the appearance of a reasonable percentage of cars.

There are those out there with enough experience that probably understood this from the beginning, but it was bugging me and I felt that a clarification was in order. OK, clarified. I hope.

Below are a couple of pictures: the first is of a 2-8-2 Mikado with a string of hoppers.( sorry about the fuzziness, still working on depth of field) The second is of a pair of SD-7’s, one lettered for the CN and the other for the old road.

blog photos 007

blog photos 008