I know “Early May update” is a little ambiguous, but I was unsure as how to title this post as I have accomplished two different things.
First, when I was planning the layout I knew I would be building a helix to connect the decks. It was the how that I wasn’t sure of. There are about as many ways to build one as there are people who build them, probably no single one is any more “right ” then any other. I just wasn’t sure how I was going to tackle it. Because you can’t obviously cut a whole helix out of a single piece of plywood, you are going to have to join the individual pieces together. Which in turn means that you are going to have to allow for clearance for splice plates if used on the bottom of individual pieces or come up with a creative way to join the pieces together where you don’t have to worry about clearance issues.
I decided to go with the latter. First was to try and figure the most efficient use of a piece of plywood. You can’t get a full turn out of a 4′ x 8′ sheet, but you can get two half circles out of one but with a tremendous amount of waste. Same goes for 1/4 turns. But I did figure that if I broke the circle into sixths ( a 60 degree arc ) I might be able to efficiently use a full sheet of plywood. Second was how to join the pieces together. What I came up with was to use 3/8″ plywood. I would take the 6 pieces and lay them out in a circle and then laminate them to 6 more pieces offset by half( a joint every 30 degrees ).
Then the problem was cutting all the pieces out and getting them to align right. I figures I could cut a master out and then use it to make the pieces using it and a pattern bit in my router table, but the thought of trying to get a ” perfect” master was a bit beyond my abilities. Turns out I didn’t have to . It occurred to me that my brother owns a metal cutting shop that uses high pressure water, computer controlled cutting machines. I asked if he could do this for me and gave him the dimension that I needed, he plugged them into the computer and in no time I had a the master I wanted cut out of 1/4″ aluminum.
Now I wish that I could tell you that I was cutting the pieces for the helix, but I still have that issue of the train room being used for storage while we wait for the carpet install. What I am doing though is working on the subroadbed leading up to the helix as I need to set the entry height of the helix loops.
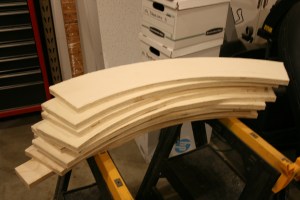
I bought a half sheet ( 4’x 4′ ) of 3/4″ plywood for the curves around the end of the peninsula and using the master, traced a bunch of curved section on it to try and see how many I could expect to get out of a full sheet. I was hoping to get 12 pieces as this would be enough for a full circle ( when using the 3/8″ plywood ), as it turned out I got 7 pieces out of the half sheet which means I can comfortably get 14 and possibly 15 out of a full sheet. YAY! Below are a series of photos that shows how it was done.


Since I already had the plywood base in for the town of Jackson, I worked up and down from there. Jackson is 3/4″ above 0, so I worked down from there to my 0 height. Coming out of Jackson is the end of the peninsula. The half curve there is a 2″ rise which matches the rise in the helix. If a train has a problem here, it won’t make it up the helix, better to know where you can see the train then when it’s in the helix and you can’t see it. Below are photos of the curves installed, you will also see that I got the backdrops painted.


As you can see I also started planning the track arrangement for Jackson, but as it turns out it is it’s own special hell and worthy of it’s own post.
Until them, Happy railroading…
