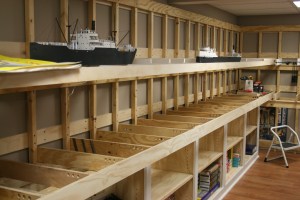
I finished the first set of cabinets, installed and painted them. I won’t bore you with the details of construction as they follow standard base cabinetry construction. I painted them white as all the woodwork in the house is painted white. Also I had painted the cabinets in the work area white and wanted continuity between the two areas.

The space above them is the main staging yard, so I will be using these for storage of the engines and train cars. Shelves will be added soon, but the doors will be made after the rest of the cabinets are done as it is easier to do them all at the same time.
As the paint was drying I went back out to the garage ( also known as the woodworking shop ) and cut the “joists” for the upper and lower decks. I then made three drilling jigs for the three different size holes that I’m using for wire runs. Each joist has two 1″ holes, four – six 5/8′ holes and four 1/8′” holes. It may seem like a lot, but I figured it would be easier to keep like wires grouped together but separate. I also notched the upper deck joists for lower deck lighting.

The picture above shows the joists set in place. The first step was too screw the end of joist to the stud and the outer edge to the cabinet. Again I started with the end joist to the left in the picture, mounted it, then using a spacing jig ( like the one used for the stud spacing ) moved down the line. I can’t stress, at least for me, how much of a time saver the spacing jig is. You’re not trying to measure the spacing for every joist. I then added a ” rim joist ” to the outer edge of the joists. I will then add a fascia to this after I start the scenery.


Once I finished the lower deck I painted the upper deck joists white for better light reflection, when dry I then installed them same as the lowers except instead of screwing them to the cabinet, I screwed them to the 3/4″ lip on the horizontal.


The plan was to keep moving around the room with bench work, but everything was working out as I had hoped so I wanted to add the sub roadbed to this area to see if there would be any sag or deflection. I cut the plywood for both decks and mounted it. The lower deck was solid, although with it sitting on the cabinets that was really no surprise. What brought about a sigh of relief was that the upper deck was also rock solid. No sagging and no deflection, even when I pounded on it.
