My normal process when faced with a large project is mentally “build” the project, looking for problems that I could run to, possible better ways to do it and so forth. A model railroad is a undertaking that will take years ( unless it’s a project layout with a deadline, like a model publication project ). Realizing this, I had to override my natural inclinations and press forward.
Wow, I’m glad I did.
The method I’m using is one of my own design, at least I haven’t seen it used any where else. I “developed” it on my last layout- some good did come out of it. I am building a mini stud wall with horizontal braces on the front and back of the vertical “studs”. For the horizontals against the wall I’m using 1×4’s cut from 3/4″ plywood. The studs are 2×2’s and the outer horizontals are 1×4’s cut from 1/2″ plywood.

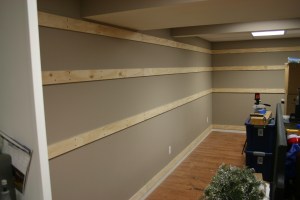
The first step was the horizontal rails. The top and bottom rails are mounting point/ spacers for the studs. The bottom edge of the middle two set the height for the layout deck. I took great care in keeping these as perfectly level as possible, using both a 4 foot level and a laser level. They are screwed to the actual stud wall.

Then I added the first stud, again making sure that it was as perfectly vertical as I could get it because it’s alignment affects the rest of the studs. After it was screwed in place I used a pair of spacers made out of plywood and cut to the same length to mount the next. Once I got a rhythm down this went very fast.


With the studs in place I moved on to the outside rails. again top and bottom are spacers. The middle two are mounted 3 1/2″ below the bottom of the inside rails, with the idea that the bench work deck pieces will slide in place. The outer edge of the bottom deck will be supported by base cabinets. For the top deck I added a 3/4″ piece to the rail to give added support and add a screw surface.

The last picture shows the bench work pieces set in place. Once actually mounted they will be screwed to the stud and the top ones screwed to the rail, while the lower to the cabinets. Out of curiosity I didn’t fully hang on one, but did give it a large tug to test it’s strength. I was thrilled when there was virtually no vertical movement even though it was not screwed in place.
The next step is to build the base cabinets. This shouldn’t take to long and then on to actually building the bench work decks.

