Northern Pacific # 328 was originally one of twenty 4-6-0 “Ten Wheelers” ordered by the Chicago Southern railroad in 1904. Before it was delivered in 1905 the Chicago Southern went bankrupt and the order went unfilled.
In 1906 the Northern Pacific found itself short on power and went shopping for locomotives. It purchased 10 of the unfinished 4-6-0’s and took delivery of them in February of 1907. They were used on the lighter branches in the Dakota’s and Minnesota. Eight of them were cut up for scrap between 1929 and 1933.
The two survivors, 321 and 328, remained because of their light weight and a rickety old bridge on the Rush City, MN to Grantsburg, WI line. 321 was scrapped in 1948 and 328 was retired in 1950. It was then donated to the city of Stillwater, MN where it sat by the Stillwater depot until 1976.
The Minnesota Transportation Museum leased 328 from the city of Stillwater and restored it to operating condition at BN’s ex-NP Como Shops.
Enter my father…
My father was a volunteer with the MTM, at one point holding elected office within the organization. At the same time he was also volunteering with the New Brighton Historical Society. The two worlds merged in 1981 when New Brighton held their first city celebration. Named “Stockyard Days” in honor of the New Brighton’s stockyards that at the turn of the century were the largest west of Chicago.
Wanting to have a major draw to help launch the celebration, my father used his connections with the MTM and was able to secure #328 to run a railfan trip in New Brighton using the Minnesota Transfer Railroad’s tracks.
So, Northern Pacific #328’s inaugural run after restoration was at the city of New Brighton’s inaugural celebration. All brought about with the help of my father.
Northern Pacific #328 running a railfan trip for New Brighton Stockyard Days, 1981.Northern Pacific #328 awaiting a railfan run.Close-up of #328 with my father (on the left) posing in the cab.
Sorry about the long gap between posts. With summer coming to a close, we squeezed in a vacation over the Labor Day weekend which was followed by a extended business trip to New York. I didn’t have much time to work on anything let alone have time to update the posts.
I was able to get the rim joist on the benchwork that I had finished. Not totally an easy task as the corner of the benchwork is rounded. In order to curve the 3/4 inch plywood around the corner I have to kerf the plywood, which involves cutting a 5/8″ slot every 1″ on the table saw. Once done, the wood will easily bend around the benchwork giving you a nice even flow around the corner. Side note: I know a lot of people will just apply a 1/8″ or 1/4″ fascia right to the ends of the joists, but I find that I will sometimes “forget” where I am in relation to the layout and bump into the fascia. Without the plywood rim joist, the fascia will flex and with finished scenery in place this might mean that you crack the finished scene.
Attaching the rim joist on the short leg.Benchwork for the curved corner.Installing the rim joist around the corner.The finished corner.Finished benchwork on the short leg.View down both legs with the rim joist in place.
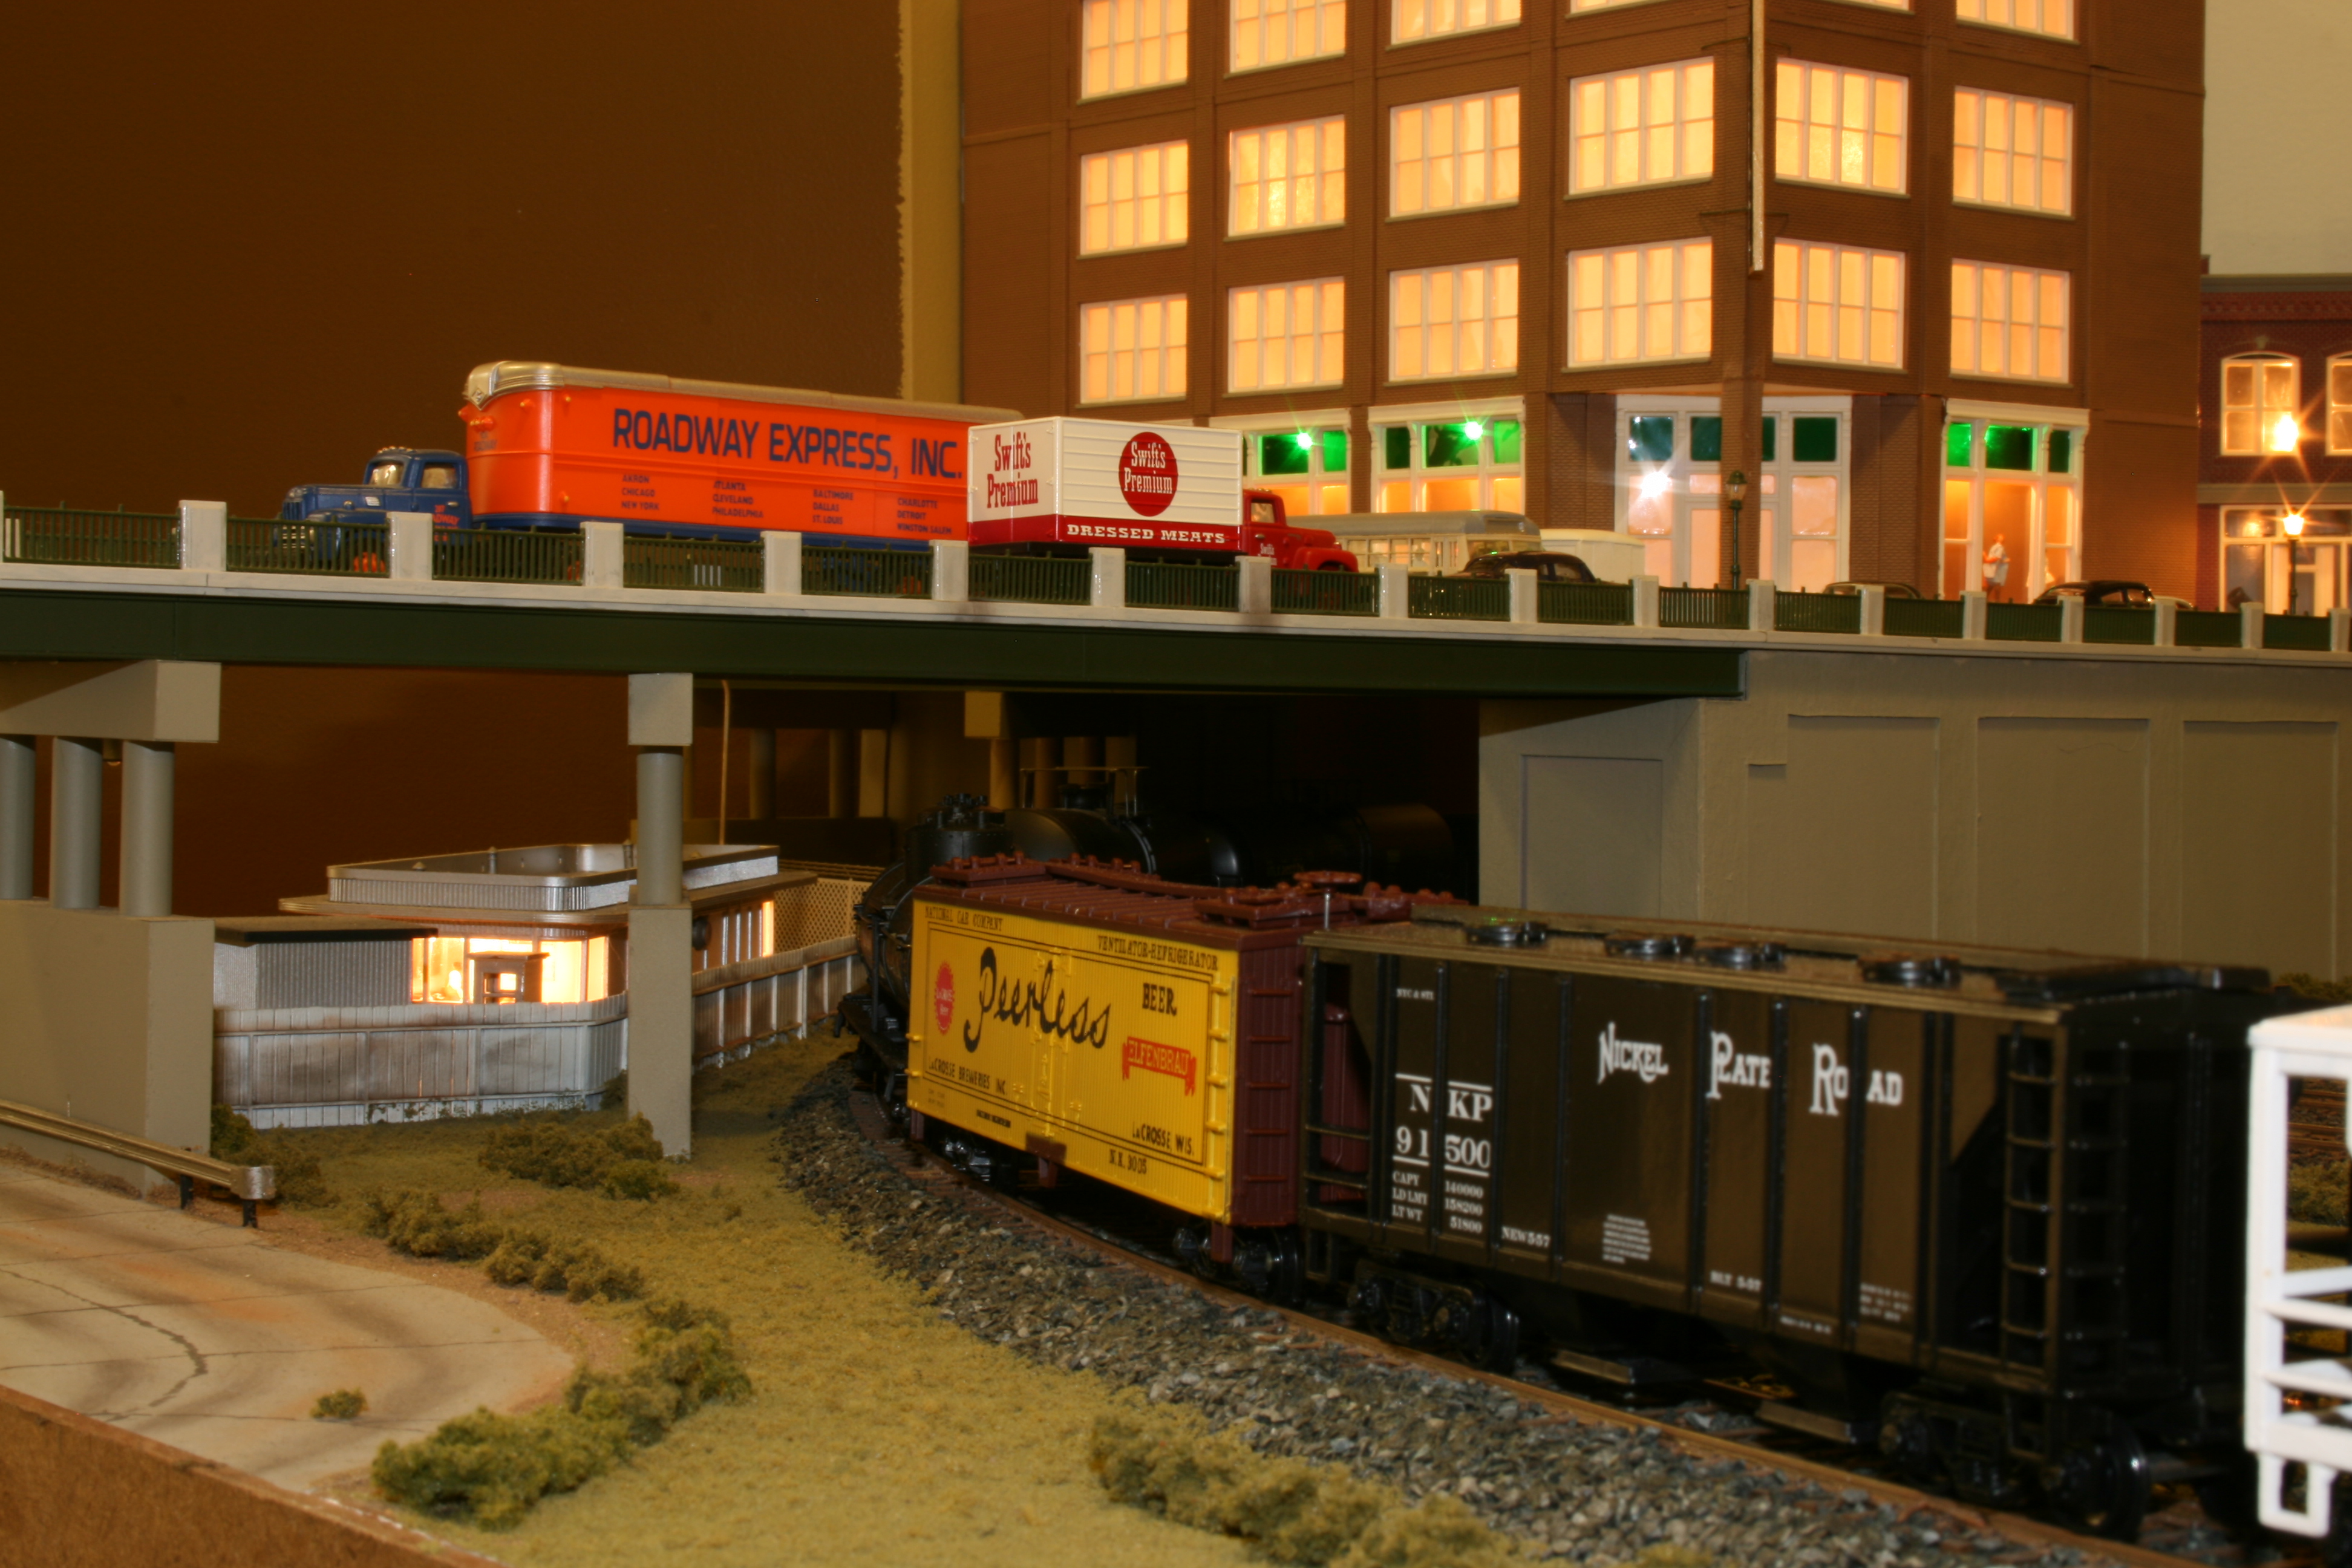
I also was able to stage my bridge/berm scene I had talked about in my last post. I had wanted to get a feel for how the scene would look. Kind of a concept to reality thing. I’ve been picturing this in my head for a long time and wanted to know if it was actually going to work. The buildings in the scene are just stand ins for the purposes of the mock up. I have finished buildings from the old layout that I will be using. Also there will be buildings to the left of the intersection as well as the far side of the bridges. With scenery in place I now feel that this scene will be exactly what I had pictured in my head.
Side view of the bridge/berm scene.Head on view of the bridge/berm scene.
I finished most of the benchwork on the one side of the peninsula with only the rim joist left to install. The big hole in the third picture is where the helix benchwork is to go. Probably my next project. As I had mentioned before I will have to “daylight” part of the wall for the utility room and I’m not really looking forward to that. Not that is tough, just that it’s going to be messy.
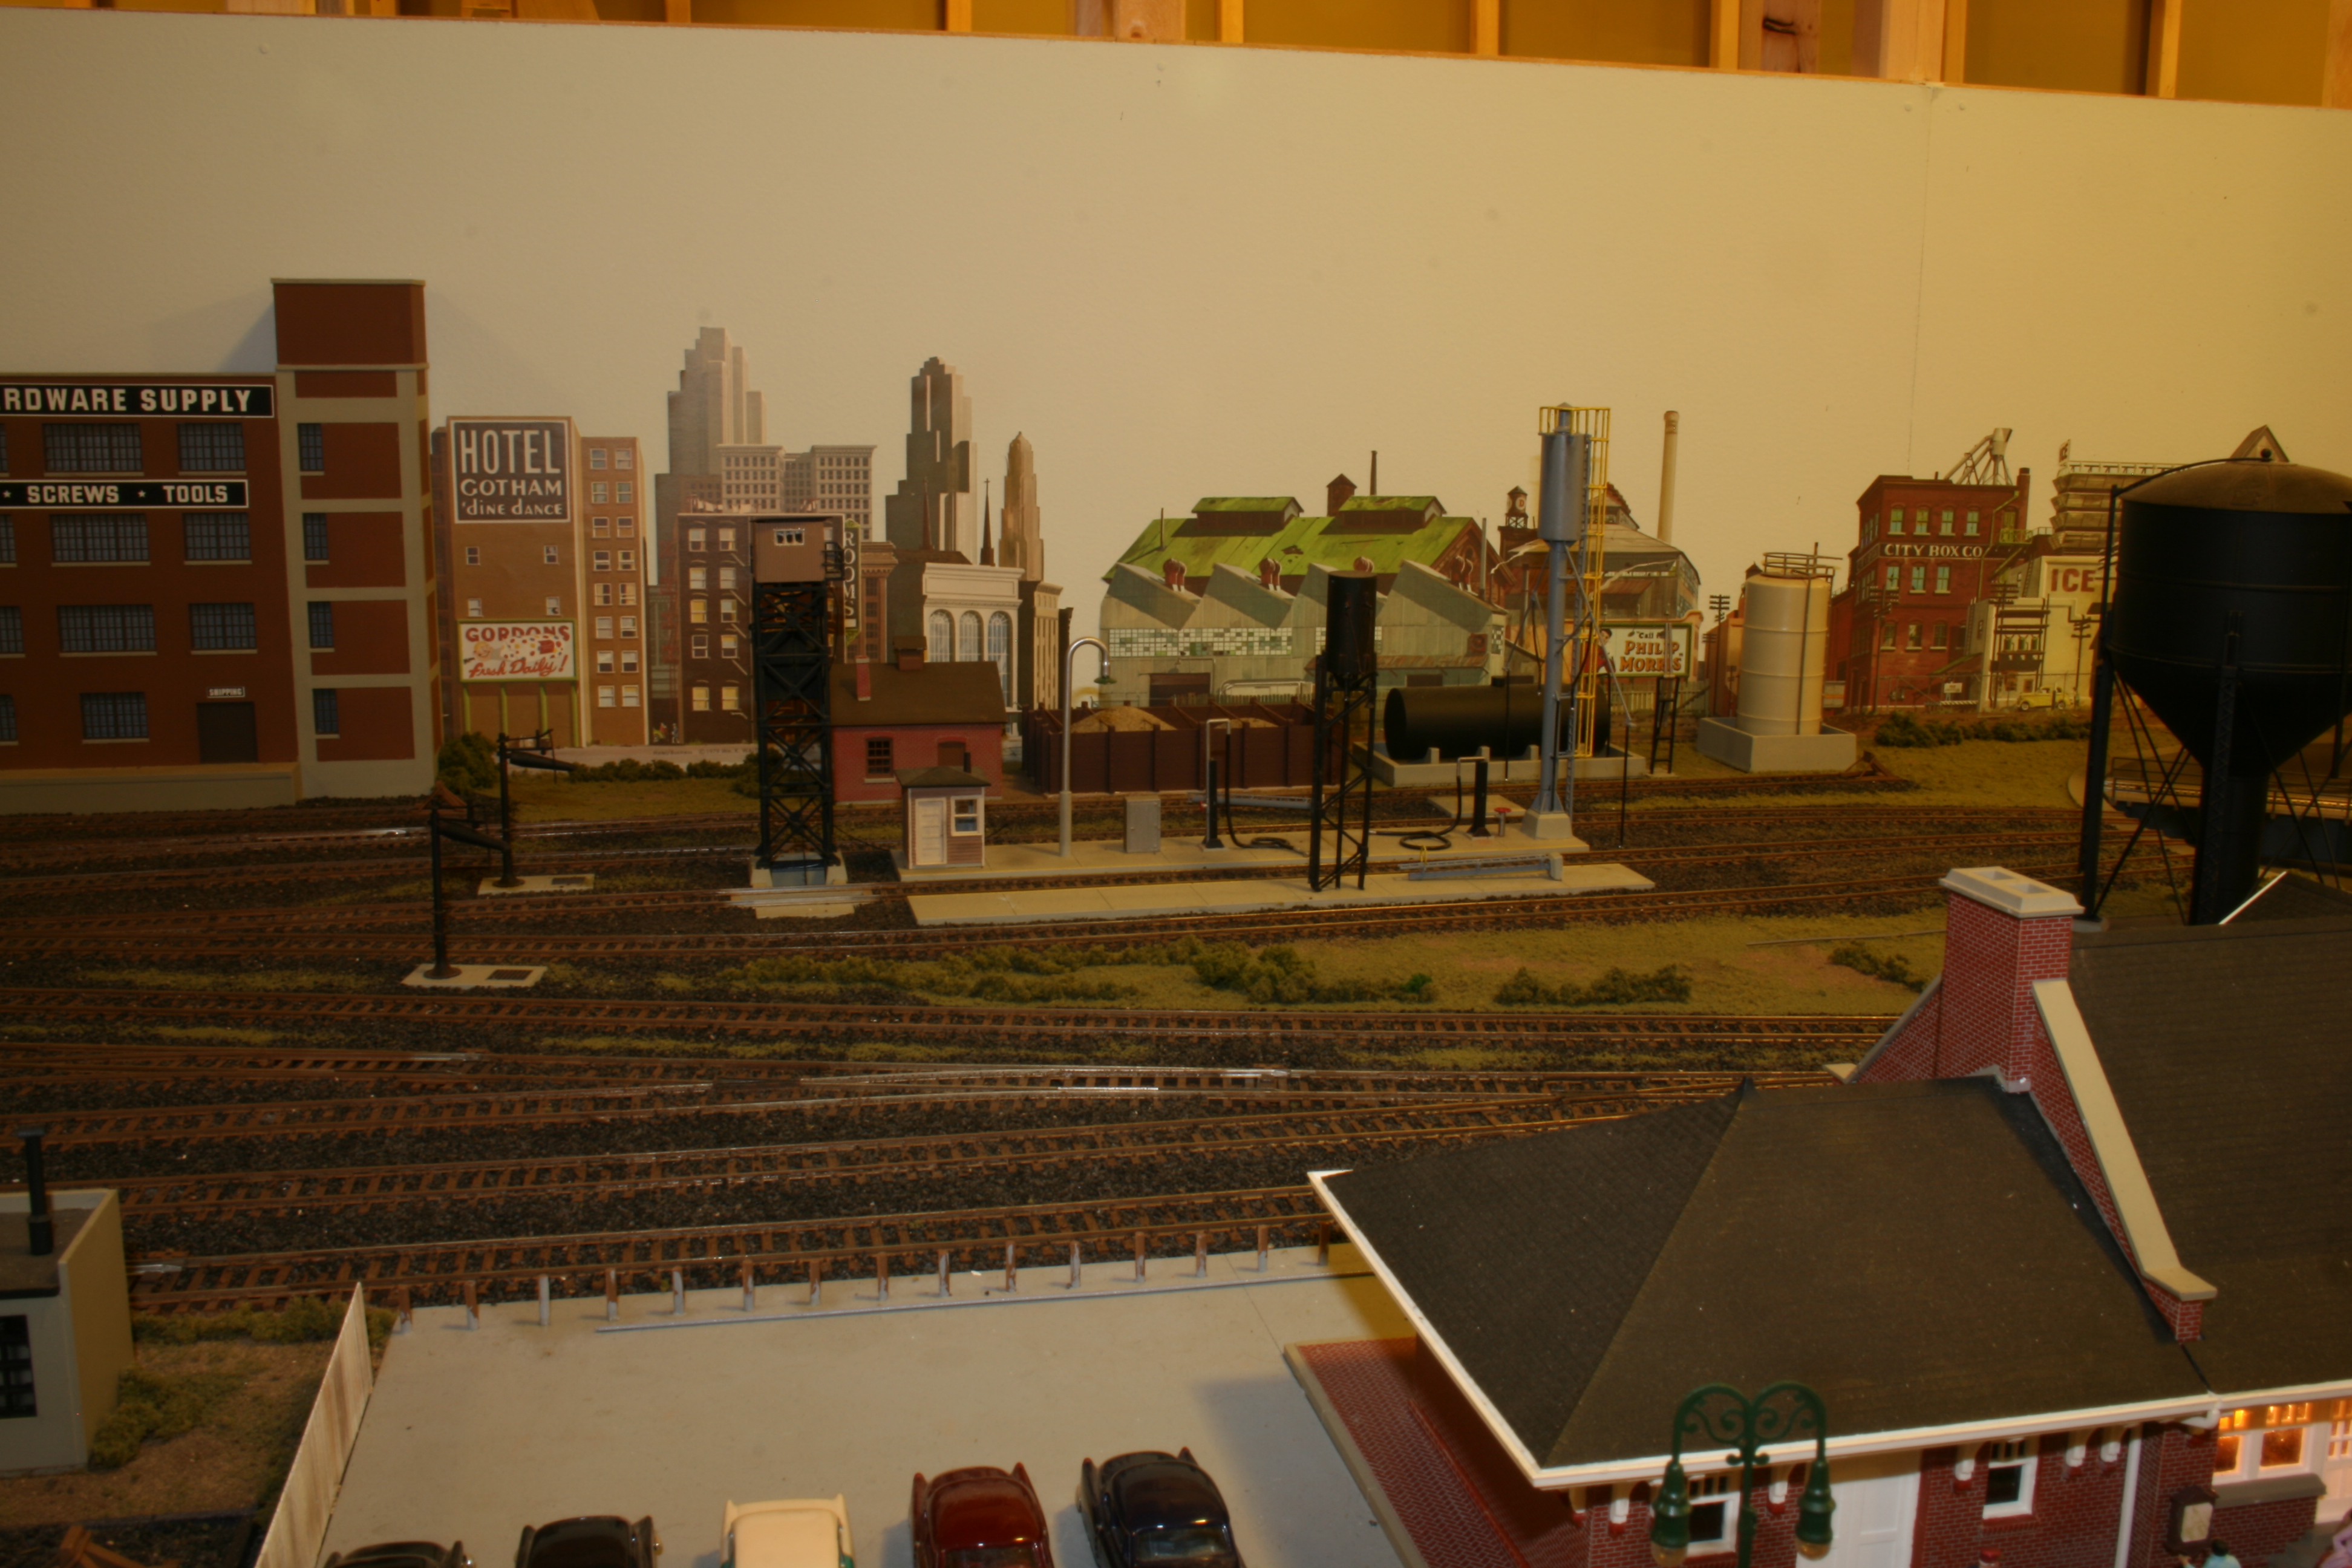
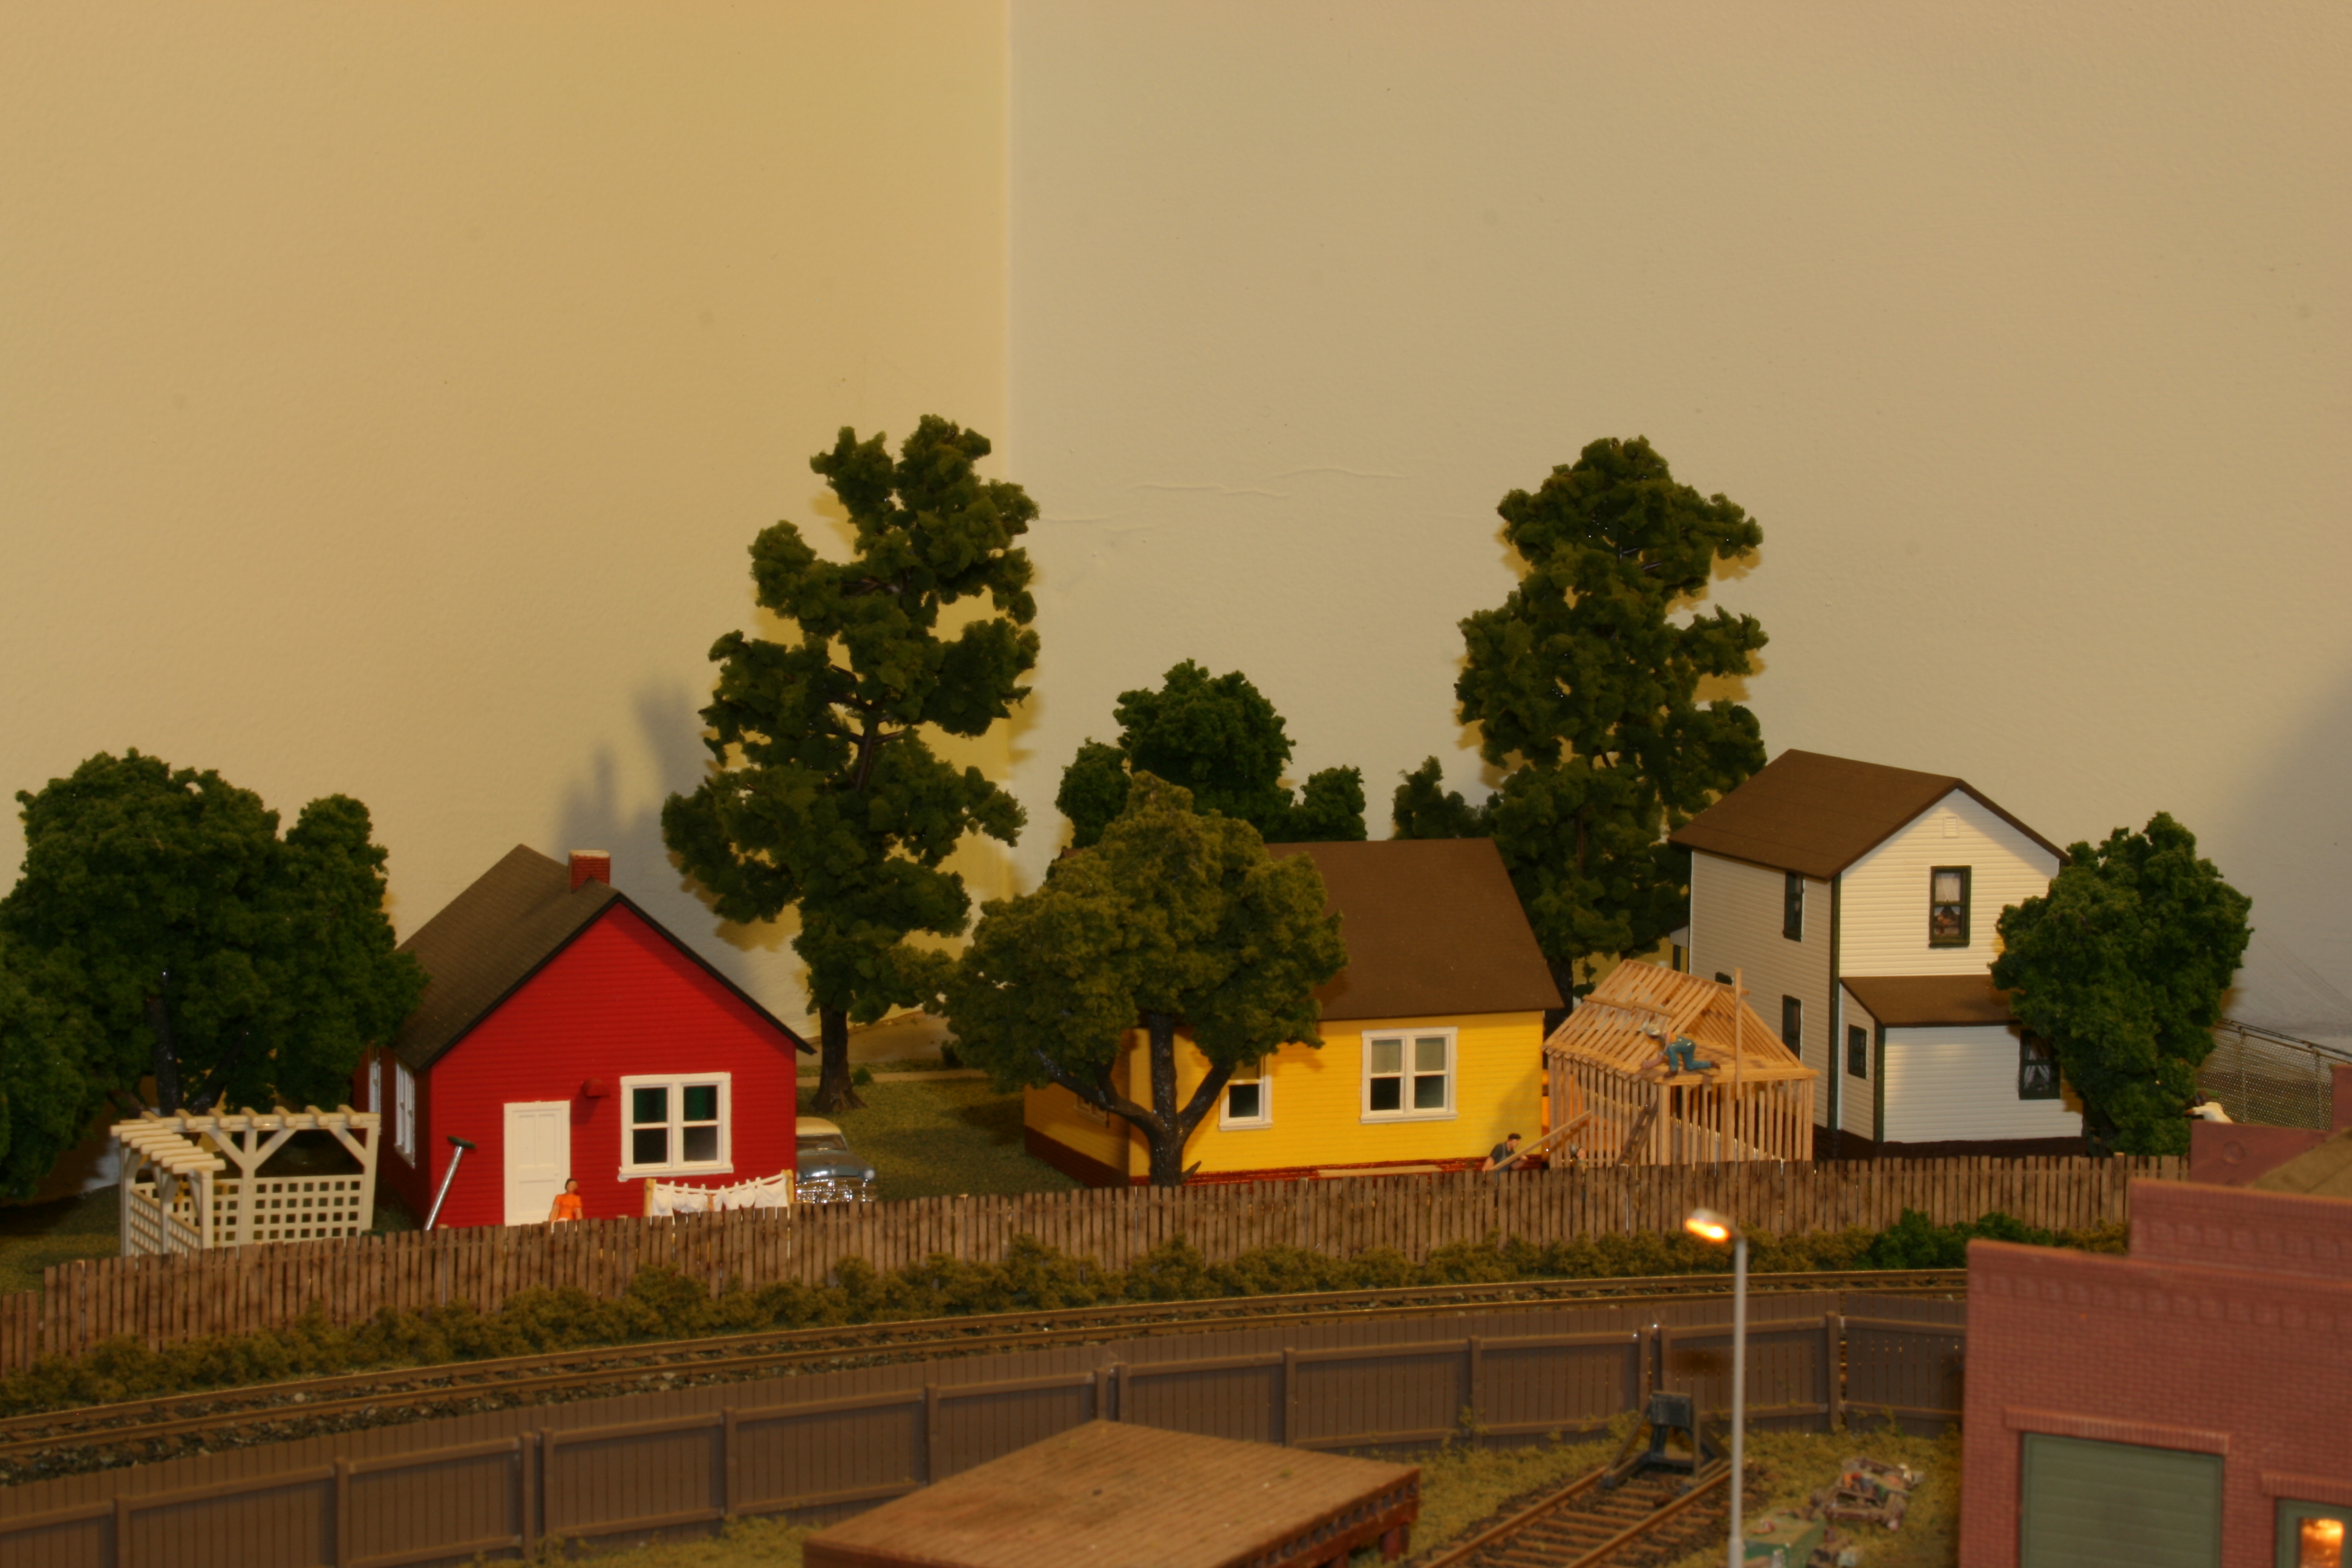
The lowered portion of the of the benchwork along the short leg of the peninsula is for a “signature” scene. The Twin Cities isn’t by any means flat. The rail lines through the cities travel through a variety of terrains, there are flat open areas, long cuts and areas that the railbeds were laid on long berms. When I first saw Walther’s art deco bridge I wanted to recreate one of the berm scenes with the tracks running along and above a neighborhood. This area seemed perfect as I hadn’t planned on anything happening on this stretch as it is across from the New Brighton rail yard and didn’t want to have people bumping into each other because of the narrower aisle width here.
View down the long leg of the peninsula.Down the short leg of the peninsula.View of where the helix benchwork is to go.Overview of the newest benchwork.
This will be quick. I finally finished the “electronics” cabinets, the ones that will house the DCC, switch controllers, block detectors, signal controllers, power supplies, etc. What should have been a simple weekend project ended up taking me over a week to finish, install and paint. But it’s done and most of the wood for the benchwork above is ready to put in. Once the benchwork is installed I will be able to start running the bus wiring to those sections that are finished.
New DCC and electronics cabinet.Alternate view of cabinet.
This week I am trying something a little different, mainly because I’m running out of decent pictures of the old layout. More of a history thing or of little treasures found.
Since my father passed away about 14 years ago my mother has been slowly going through the boxes of stuff that my father had collected. He was the ultimate pack rat. Anything she finds that even remotely has anything to do with railroads, she sets aside for me. I usually bring it home, look at it and decide whether to keep it or toss it. But sometimes I’ll set it aside to look at later and it ends up tucked away somewhere until I come across it again. Such is the case with the following.
While planning the railroad, I knew that I would have a staging yard for the “rest of the world” where trains or freight cars would come from somewhere else to the main yard in New Brighton. For freight this would be best handled by the Minnesota Transfer Railroad, a line set up by the 9 major railroads serving the Twin Cities. It would move cars between the major rail yards, while also serving local industries. In New Brighton that would have been the Twin Cities Arsenal, the New Brighton stockyards, a pole and tie yard and several lesser industries.
While researching the MTR online I found a group of photos showing the line in action, almost exclusively with steam power. I came across a Proto 2000 0-8-0 at a great price and figured I would reletter it for the MTR and my motive power for the transfer railroad would be handled.
The other thing a found while researching was the constant reference to a book – Gateway To The Northwest, The Story of The Minnesota Transfer Railway. I decided I had to have this book, only it was self published by the author in 1954.
So for about the last two years I have been regularly checking the internet for copies, as well as auction sites and every second hand bookstore I could find. While going through boxes of the stuff I had set aside until later and putting what was “keepers” in the new cabinets, I almost fell over when I came across some photocopies. My father had photocopied the entire book I had been searching for.
Moments later I came across not 1, but 3 copies of the book itself. I should explain that the book is soft covered and only 32 pages long. It mentioned that the “Transfer” with the power and financial backing of 9 major roads dieselized in about 2 years and by 1954 ( the year I’m modeling ) only had two 0-6-0’s on hand. 1 for backup and the other with a flanger. So now I’m looking for a 1000hp Alco to handle the transfers.
The Book.
Next up is copy of ” The Railroad Telegrapher “. It’s dated September 1913. Something my grandfather had saved and my father ended up with. It contains a wide variety of opinion pages, stories, updates on telegraph operators for all roads by divisions ( weddings, deaths, births of children, promotions, transfers, etc. ) , track updates for all roads by division ( tracks taken out of or returned to service ), as well as poetry, updates on the Women’s Auxiliary, jokes and of course plenty of ads aimed at railroad workers in general, telegraph operators specifically. Kind of a Readers Digest for the railroad world.
Saved by grandfather and passed along by my father to me.
Last up is a train order sheet that was tucked into the book. I’m sorry that I didn’t pay attention to where it was in the book as it may have marked a page that referenced my grandfather. I also apologize for it being in two parts as it was to big for my scanner.
Train sheet from the C,St.P,M&O, first half.And the second half.
I finally worked out the logistics of the semi-permanent section of the benchwork over the window. I cut the wall sections and added in blocks that can be unscrewed to make a 4 foot section removable should I need to access the window should it need maintenance of some sort. Only the upper deck would come out as the lower deck is at a height that is lower than the window. As I mentioned because of this I had to move the bridge scene farther into what was the Duluth yard than I wanted it.
The back corner benchwork finished.The window area with the removable section in view.
As far as wiring goes I added in plugs to the lighting string, which because it’s nothing more than a extension cord with lights wired into it would seem pretty basic, it took awhile for me to figure it out and wrap my head around it. When I did it was a “aha” moment as well as a “duh” moment. As far as the rest of the wiring goes I will have to add in terminal blocks for the DCC buss, switch wiring and lights. I prefer to keep connections to a minimum in wiring, but unfortunately this is unavoidable.
Plugs to disconnect the light string.
And last, but not least, is a closer view of the bridge scene. Why is it a big deal? Because at this point it helps to have things that shows you where you’re headed as you push ahead with the benchwork.
It’s surprising what little most of us know about our own family histories. Yes, we know about our immediate families from the time we are aware enough to remember. But what about before that? I know that my father grew up in northern Minnesota on a farm ( hated it ), Joined the Army Air Corp in WWII, became a Lieutenant and commanded his own B-17 for thirty missions. After his thirtieth, he flew cargo planes until rotated back stateside where he became an instructor. Other than that he talked little about the war. He went to college and got his degree in Electrical Engineering and went to work for Honeywell Aerospace designing guidance systems for rockets. Yes , he was a rocket scientist. (Absolutely loved it)
But go back another generation and it gets tougher. Which brings me to the reason for this post. My grandfather was a farmer, obviously since my dad grew up on the farm. But that was his second career. Once my dad realized that model railroading was more then a passing fad with me ( as it had been for my brothers ), he told me that my grandfather had worked for the railroad before he bought his farm. There were other little details about it that he passed along, but no one seemed to know a lot about what he did or even which railroad he worked for.
My mother gave me a couple of pictures of my grandfather, with those and some digging I am able to put together the following history of my family’s railroad history.
When my grandfather came over from Sweden there is little known about what he initially did. He ended up in southeastern South Dakota where he became a telegraph operator for the Chicago, St. Paul, Minneapolis and Omaha Railroad.
My grandfather outside the depot in Montrose, SD. Undated photograph.
The first known station that he worked out of was in Montrose, SD. just northwest of Sioux Falls, SD. As you can see in the photo he is standing in front of the depot in Montrose, if you look to the left in the photo you can see the C,St.P,M & O boxcar spotted behind the station. Of importance to the family is that it was in South Dakota that he met and married my grandmother.
My grandfather in the depot at Madelia, Mn. in 1909
The next photo shows my grandfather in the depot in Madelia, MN in 1909. My father told me that as you gained experience and seniority you moved stations. Moving from the smaller towns up the line towards a major city. In this case he was working his way up the line towards Minneapolis/St. Paul. Montrose was 259 miles from MSP. Madelia was 105 miles from the cities. Side note, at the time of the Madelia photo my grandfather was 22 years old. The last reference of my grandfather that I could find was a mention in a company newsletter from 1920 where it mentions that he was taking a fishing trip to central Wisconsin and everyone was looking forward to the fish fry when he got back. At this point he was working out of the station in Savage, MN. Savage, MN. is just 20 miles from Minneapolis. My father was born in Savage in 1918. At some point while working out of Savage my grandfather decided he had enough money, quit the railroad and moved to northern Minnesota and bought his farm.
Interestingly enough, my wife’s grandfather ( also on her father’s side) worked for the Soo Line in central Wisconsin. One has to wonder, did they possibly meet when my grandfather was on his fishing trip?
The yard throat and fueling facility with the depot in the foreground.Another shot of the neighborhood across the tracks.Opposite view of diner scene where the railroad turns into the backdrop.
As promised and long overdue, I have an update on the further adventures of benchwork construction.
First up, I finished the second set of base cabinets. I love these as they hold a ton of stuff that had been sitting around in boxes. This set holds a bunch of old dvd movies, a ton of cd’s ( that someday will be loaded on my computer, someday ) and a good portion of my model railroad magazines, plus. As you can see the aisle width is rather generous and thanks to doing a lighting plan ahead of time the fluorescent lights are centered over the aisle.
New cabinets in on the other side. New home for music, movies and model railroad magazines.Another view of the base cabinets.
Next up, I finished the lower deck on the south and west walls. The upper deck is done up to the window.
Back wall almost complete.
The lower deck is the New Brighton yard, the upper deck will be the Duluth yard. I had planned on running the Duluth yard across the window, but the nagging thought that I may have to access the window from the inside ( due to a broken window pane or… ) made me rethink this. I decided that I would have to make the upper deck semi permanent in front of the window. Still working out the logistics, I think I have the benchwork figured out, still working out the wiring portion. So as not have to tear out a portion of the yard, I decided to move the bridge scene in front of the window. This is going to truncate the yard, but I believe that I can still make the yard work.
The problem window area.
Once I get the upper deck in front of the window figured out, I will proceed around the upper deck and be able to finish the area over the west wall. I have all the joists for the upper west wall done and ready to install. Two things in this aisle – the west wall is the deepest scene at 3′ and this aisle is the narrowest, again 3′. The DCC tower marks the aisle width plus 6″ overhang for the benchwork. 3′ was what I had set as my minimum aisle width and is still plenty wide. Even though there will people working the yards there is nothing on the opposite side that will have someone in the way. The DCC tower is a leftover from the last layout and needs to be cut down to match the cabinet height. To its left will be an “electronics” cabinet. This will have the detector circuits for signalling, the Digitrax DS-64 stationary decoders for the switch machines, power supplies for lighting, etc.
View of the aisle from the other angle.
The last photo shows the area is where the base for the helix will go. For the keen eyed out there, I know that it is narrower then it is long. I will be “daylighting” the wall to the utility room. It had to happen or I would have to compromise a curve radiuses on either the track coming out of the yards, the helix or both. Did this last time and I was sorry I did.
View of the back wall with the hole where the helix will go.