Category Archives: On The Workbench

My First DCC Conversion, PT. 1…

This is my first DCC conversion as opposed to my first decoder install as the early Athearn, Bachmann and LifeLike engines came DCC ready. All you had to do was pop out the jumper plug and add the decoder. All were without sound. Ah yes, a project for another day.

As I had mentioned before the test subject is a Athearn Blue Box SD 40-2. I also had mentioned that I had started this project about 10 years ago. Not much was really accomplished, I had gotten a couple of things for the conversion and started working on the shell.

What I had accomplished at that time was cutting out the front radiator fan and fitting a winterization hatch to it. Not sure of the brand but it has an etched metal grill. Perfect for a speaker to be mounted under it. I also had built the baffle for the speaker. Again not sure of the brand of speaker, though I suspect it is from Sountraxx. In addition to the speaker the other purchase at the time was a better motor than the stock Athearn. It is from Accurate Lighting and a quick web search shows that you can still get them from HobbyLinc.com.

The Accurate Lighting motor upgrade, I had picked up two of these.

The speaker baffle and winterization hatch.

Baffle and hole for the speaker, will be covered by the winterization hatch.
Speaker installed into baffle.
Hole cut for the speaker, speaker installed.
Winterization hatch installed over speaker.

Once I do the final install on the speaker I will close up the enclosure. Also the four wires on the motor are for a an install on a standard DC locomotive, one pair to each truck. I will clip one set when hooking up.

Having the motor in place and the speaker ready to install the next step was to get power from the tracks. Using wire on hand, I soldered wires directly to the trucks. Red to the high side, this would be the one on the BB Athearn that had the metal bar running across the top of the motor and black to the low side on top of the truck.

The trucks wired for pickup, unfortunately the wire was to brittle and already had broken off the top of the right truck.

Unfortunately the scrounged wire was too brittle. A little handling and one broke off right away. So, off to the internet, specifically Amazon where I found a very flexible 28 gauge wire. Unsoldered the old and installed the new.

Trucks wired motor installed, ready to start the final hookup.
Let there be light…

Part of the conversion was adding new lights to the engine. I believe one of the reasons I had not gone much further with the project was that I needed to add new lights to the engine. The old Athearn incandescent bulbs were to big and I knew that even smaller incandescent bulbs ran hot, so clearance was needed as to not melt the plastic of the cab.

Well in the time between then and now, LED’s have really come into their own. I stumbled across LighthouseLED’s. Their selection is quite complete. Everything from 5mm down to pico size bulbs. Didn’t even know there was a pico size LED. And you can get any of them prewired with a resistor. Saves a lot of time and frustration. My first order included a white SMD LED mounted on a small resistor board with leads. It was hard to tell the size of the board from their diagram. It turned out to be about 1/4″ by 3/8″ (sorry, didn’t feel like running down and measuring). Which meant the it would show if using to light the front headlight. But it fit in perfectly to the rear of the engine for the rear light.

LED board with resistor installed for the rear light.
Rear light lit.

For the front I ordered a prewired 3mm bulb. I made a bracket out of styrene to hold it up in the headlight/number board housing. Still working on fit, will get you a couple of photos when placed. In addition I ordered some prewired pico sized bulbs that are amber. These are for the beacon on the cab roof. My thought was that when I got the bulb I would drill out the beacon and slide it in. Turns out I didn’t need to as Details West had already done this.

Thought I was going to have to drill these out. Luckily they are already cored.
The unlit pico sized LED for the roof beacon.
The amber pico sized LED for the roof beacon.
The pico sized LED in the strobe housing.

The decoder that I’m using is a Sountraxx Econami ECO-PNP. I chose this one primarily based on price and basic functions. It has standard motor functions, sound and front and rear lights. In addition it has several extra programmable functions. One of which is a Strato-Light beacon function. I have to image the decoder will make the beacon flash like the original. My dilemma now in seeing the size of the pico LED’s is do I want to add front wheel slip lights and step lights. Or keep it simple for first install and go with what I planned.

At this point I think I’m going to go with simple. I have all the parts ready to install. Just a little afraid after reading posts of people whose installs didn’t go as planned. But I’m ready to muscle past that, as I’m really wanting to see a diesel with a flashing beacon, something that doesn’t seem to be on many factory diesels.

As of now that’s where I’m at, will update in the near future.

Till then, happy modeling….


The Evolution of a Paint Scheme…

As you may (or may not) remember that the reason I model a freelance railroad is an off hand comment made to me by an experienced model railroader friend of my fathers. He was over once visiting my father and stopped down in the basement while I was running trains on my older brothers layout. My transgression was (as far as I know) running an engine from one road with the caboose from another. He told me I was doing it wrong and that wasn’t the way a real railroad would do it. No offense, but I was 6 at the time of this heinous crime. That comment always stuck with me.

When I was about 11 or 12 I became a more serious modeler complete with a subscription to Model Railroad Craftsman.

It opened my eyes to all the hobby had to offer. And yes it showed me that railroad A would not run a caboose from railroad B. I also became aware from the letters pages that there were a lot of people who were ready to point out that someone had not done something prototypical. That old comment came back to haunt me and I was afraid to do something wrong.

I also became aware of the “Freelance Railroad”. One that had their own way of doing things, but within the context of what was prototypical for that region. The most famous was the Allen McClelland’s Virginian and Ohio. It’s still talked about like it was an actual railroad. My favorite though is Frank Ellison’s O scale Delta Lines. Frank would remove the pilot trucks from steam engines because they caused derailments. Though a well detailed and scenic layout, operations were more important than scale fidelity.

So I decided at 12 that was the way to go. Came up with a semi plausible name and a totally hideous paint scheme.

When I returned to the hobby I decided to stay with the freelance theme. I refined the name to the Grand Forks and Western Minnesota, DBA the Grand Western. From there I started work on a paint scheme. The early attempts sometimes bordered on circus like. I think I kept the local hobby shop in business just buying undecorated Athearn diesel shells. A big part of the problem was that they were too intricate for someone with no airbrush or masking skills. It was spray can and hand brushing.

I finely landed on a scheme, that looking at it now was very close to the Southern Pacific’s. It was a light gray body with a red cab, nose and rear end. The roof was painted black with the thought that it hid the diesel exhaust along the top. A basic utilitarian scheme and easy for the shops to keep up. And I could use a spray can for the gray and brush paint the rest.

The original diesel paint scheme, kept it simple and utilitarian.
A change of name and paint…

First of all you will note the change of name. I went from Grand Western to Continental Northern because for what ever reason people couldn’t understand the Grand Western name, but will go Oh, OK when they see Continental Northern.  The black patch below the cab is where the GF&WM reporting marks were. The gray paint is no longer available so I removed the reporting marks and left the black patch.

But before we talk new engine paint we have to look at cabooses. I had painted one in the gray and red scheme to match the diesel scheme. It never struck me as very caboosy. (I know, not a word). The scheme I landed on was the basic red caboose.

The older wooden cabooses of the fleet.
Side view of the older wooden cabooses in the traditional red paint scheme.

When I started painting the modern steel cabooses I wanted something a little more modern and interesting looking. I remembered a paint scheme from a video a rented from the LHS from Model Railroader. It was on airbrushing, as my wife had gotten me a vey nice/expensive new airbrush. I found the process daunting with prepping the surface, mixing the paint with thinner and clear coating the finished car. Add to that the clean up with oil based paints and it was a lot. I held off airbrushing until acrylics came in to their own.

But I always remembered the finished caboose that Jim Hediger painted in that video. Bright red with yellow ends. With my airbrushing and masking skills greatly improved I decided to recreate that look for my road.

Side view of the modern (steel) cabooses in the “Safety” paint scheme.
Rear view of the modern cabooses in the “Safety” paint scheme.

Side note, I have found a great resource for LED’s. It is Lighthouse LEDS. I found them while gathering supplies for a different project. They have prewired flashing red LEDs. I plan to equip the cabooses with rear red flashing lights powered from the rails.

So when it came time for the diesels I figured I would just carry that scheme forward to them.

And this is the look…

The new “Safety” high visibility paint scheme. Wanted to update the look of the diesel fleet.

The Continental Northern refers to it as their “High visibility Safety scheme”. The diesel itself is a Athearn BB that I have been converting to DCC/sound (for like the last 10 years) and is the subject of an upcoming post. I had the shell ready for paint and it became the test bed for the new scheme.

More found stuff…

The reason this became something of a priority was that as I was digging through the shelves looking for cars that needed to be put together, I came across two Broadway Limited Import SD 40-2s and a Bachmann GE 8-40c that were undecorated. The BLI engines are DCC/sound and the Bachmann will need to be converted.

So loving the new look I went ahead and started the BLI engines, held off on the Bachmann as I need to check out decoders for it.

Fresh out of the paint booth. Last color applied, soon to be unmasked.
Fresh out the spray booth, time to put them together.
The BLI SD40-2’s front view. Painted and assembled, waiting for decals. Then final assembly.
Rear view of the BLI SD40-2’s. Ready for decals.

And that’s where I am with them at this point. They just need decals and then final assembly. After that it’s off to the programming track and then the layout. Will keep you updated.

Till next time, stay safe and happy modeling…


Freight Car Friday #9…

Well it’s been a bit and I apologize, it’s not for lack of trying. Several things happened on the way to this post.

First…

I got the last set of well cars painted, cut out all the decals and had them sorted per my routine for this type of car. Went to start applying them and because of their age they absolutely would not release from the backing. Got a couple softened up enough that I literally pealed the decal off, but it wouldn’t stick. I checked the PPW/A-line/Arrow hobby website and they still had them available, In fact they are a updated set. They arrived yesterday.

The last set of well cars awaiting decals.
Second…

I then decided to try my hand at containers. There are  approximately 18 from Proto Power West that I had bought at the same time as the well cars. I had also picked up decals for them at that time. Painted the containers and went to apply the decals starting with a set of American President lines decals. Guess I liked the big red eagles on the sides. Applied the smaller informational decals first, when I tried to apply the eagles, they disintegrated.

The decal for the APL containers were old and fell apart on application.

I will strip off the decals from the APL containers and try something else. In the meantime I tried a set of Sea Land decals that I had with much better luck.

Completed Sea-Land containers ready for revenue service.

There were enough for eight so I still have another ten or so to go. In addition to the decals for the red well cars I also ordered a set of decals for the stray Gunderson car that I found. I was looking at what I had left from that decal session and found I had used a couple of decals that had not gone on well on the first attempt. Also I picked up some 20 foot containers for variety.

And lastly…

After being stuck in the house for the last six months my wife decided that after 23 years it was time to do a little upgrading around the house. Much like the rest of America. Turns out this means most of our main floor. Most of the rooms will get new paint. A redo of the kitchen (appliances and counter tops as well paint) and a full wall, floor to ceiling shelf system for her dishes (she likes to collect dishes, her hobby). A lot of this will be my doing, obviously not the counter tops. Just everything else.

And that has been what has been consuming my time. No complaints. It’s been awhile since I have had a major project to do and I like doing them. Just like completing something on the layout, finishing these projects is extremely satisfying. And no, that was not put in there in case she reads this.

There will be time in between to get small projects done and as I do I will update you. Looking forward to finishing the well cars and getting back to focusing on the actual layout. Also there are still a bunch of freight cars to be done.

Till later and hopefully not as long as it has been, Happy hobbying…


On The Workbench #7…

On the workbench is one of the “special projects” I had mentioned last time. The backstory on this is that the upper level represents northern Minnesota. And in the Land of 10,000 Lakes we seem to have an equal number of rivers running someplace. This is especially true up north where everything is draining towards Lake Superior. A spot just ahead of the junction looked like it was just crying for a nice double track truss bridge over a river. So I hauled out the Walther’s catalog (www.walthers.com) and started looking for one. When I got to the Campbell Models section (campbellscalemodels.com) I realized that I had one tucked away somewhere. Started digging and finally found it. And thus the project started.

Where I want the bridge to go.
The “new” kit.

As you can see by the price I’ve had this awhile. The sticker on the box says $24.75, the current suggested retail is $70.00. Opened it up and everything was there, well, almost everything. Much like the missing decals for the Whale Belly tanker, the instructions for the bridge went missing.

The kit, sans instructions.

So I headed on over to Campbell’s website to see if I could get a set of instructions. It turns out that you can, once you prove you own the kit. I’ll be honest, I was a bit taken back by this. I got over it once I realized that the instructions were mainly full sized templates that you built the bridge over. Having those in hand you don’t need Campbell’s kit, as you could supply your own material to build the bridge with.

Not wanting to wait for the instructions I headed to Google images. I found plenty of images of the finished bridge, all the same shot. But I did find an image that was a shot of part of the instruction sheet. It was nice as it showed about half the bridge with cross sections of the various pieces. So I printed it out and figured I would wing the rest.

The first thing was to figure out the spacing on the cross beam/supports. I took the total length and dived for the seven cross beams. I also marked the centerlines of the cross beams.

The alignment marks in place.

Then using my square I started gluing up the base.

Everything aligned and squared off.

Having squared up and glued the base sections I made myself wait till everything was set and dried. Not an easy thing when you could charge ahead, even though not everything was set. Once the glue was dry I moved on. Next up was the base longitudinal stringer and the vertical uprights.

Setting the uprights in place.

Lastly, the end diagonals and the top stringers along with the embossed paper gusset plates.

First side done, with gussets in place.
Backside gussets in place.

I realized that if I had the instructions I would have built the side panels over the templates and then glued them to the base. I figured this out mainly from the gusset plates as I had to cut them to fit around the finished pieces. The next photo is of the finished bridge primed.

The bridge done and primed.

I have to apologize, I didn’t take pictures of the other side being done, just seemed redundant. And then I was suddenly finished with it. The main thing I missed by not keeping the photo record going were the upper web trusses. Campbell had you making these up with small pieces glued into a balsa channel. For this I would have needed the templates. What I did instead was take a styrene web truss, cut off the flange and glue it into the balsa channels. Then I glued them into place.

After that, I obviously primed it. After 24 hours I gave it a final coat of flat black.

In it’s final color waiting for weathering.

Considering that I was working without instructions, I think it turned really nice. Of coarse now I have to cut and fit it into place. And just like the last bridge I added in after the track work was in place, I will have to move the feeder wires first.

Well for now that is the end of this adventure. Till next time-

Happy Railroading…


Workbench Wednesday #5…

Welcome to workbench Wednesday #5. These are things I was working on as I was waiting for glue or paint to dry on the grain complex. They are filler buildings to run along the backdrop in Jackson.

As I had mentioned in the original plan there are feeder barns and stock pens in this area. I built the grain complex for the end of the siding, but tried various small industries to fill in the rest. Problem with that was then there would be cars set that would have to moved to switch the complex.

I decided to go a different route. Instead of a lineside industry, I added several small businesses and a coupe of apartment buildings. All modelled from the back. The apartment buildings are Walthers (walthers.com) Parkview Terrace Apartments (PN. 933-3177). They are perfect because they are made as a backdrop building. Liked the colors that they were shown in but not the raw plastic. So I painted them to match the box art.

Since I wanted to light them and the fact that they were open on the side that would go against the backdrop I sealed the backs.

Backside of the apartments, light block added to the left one.
Apartments from the front, one with and one without the rear backing.

For the businesses I used what I had on hand. Again they are from Walthers. They were a group of buildings I had picked for a main street scene. Wasn’t going to happen. They are simple kits that Walthers had made for them from Kibri. Only a couple of different styles with different architectural detail and color. Since I only needed the backs, I measured what depth I would need and cut off the fronts. And again added styrene to the open side so that I could light them without light leaks.

The row of shops from the rear. Cut down for the backdrop.
What was the front of the shops, now cut down with styrene covering the opening.

At some point in time I got bored and assembled them without thought of painting them. The plastic color is not natural, so I will be painting them (unfortunately brush painting) before installation. In addition all buildings will have something in the windows (curtains, blinds, etc.) so that they look occupied. I plan on blocking some windows so that when lit not every window is aglow.

This is what the scene will look like when done.

Background buildings in place.
Looking from the other direction.

It should be a rather convincing backdrop for the town. The apartments and shops will fill space without really registering in your mind that they are there. Of course they will need a lot of weathering as they are right along the tracks. That, and some trees and a fence, plus ground cover and the appropriate details and it will be a great scene.

That’s it for now. In full helix mode (update to follow very soon) so no more of this kind of work for awhile.

Will post on the helix soon, till then…

Workbench Wednesday #4…

In this edition of workbench Wednesday I will continue on with the grain complex.

Having finished basic construction it was off to the spray both. Not a easy task as my booth is two feet wide by two feet deep and the complex is just under 30″ assembled. The walls are all flat white. My first pass through with the roof was a dull silver, however they really stood out. I didn’t think any amount of weathering was going to change that. So I repainted them a light grey.

In the pictures the walls and the roofs look a lot closer in color than they really are.

complex painted, awaiting weathering.
Alternate view.

Side note: after painting and before weathering I added the shingle roof to the office.

I started to weather the building using Pan Pastels (panpastel.com). I have two sets, one is weathering earth tones (rust, browns, white) and the other has black and grey tones. Really like the thought of them and all the demos I have seen make it look easy. However, it requires a lighter hand than I seem to be able to master. So I went back to my weathering chalks. I’m use to them and can control them better. I did use the pastels when doing the rust color and I think it turned out well. Baby steps I suppose.

Anyways, this is how the complex stands now.

Sorry about the angle, complex weathered.
Main building with dust collectors and grain loading pipes weathered.

I also did the grain bin. I used a technique that I had used on a sheet metal sided grain elevator to highlight the banding on the bin. Not one hundred percent sure I like the look. I’ll let it sit a bit and decide if I still like it before permanently installing it.

Grain bin finished and weathered.

And this is the complex sitting in it’s new home.

The complex set in place.
Looking south down the mainline at the complex.

I still have the large transfer pipe to weather and I have to add the window “glass”, but for now it is basically done.

Since I have the helix now to work on, I’ll walk away from it now before deciding if it needs a little more and what fine details to add.

I will get you an update on the helix soon. Till then…


Workbench Wednesday #3…

Welcome back to Workbench Wednesday #3. Got the order from Walthers (walthers.com) and should have enough to complete the project. So let’s jump right in.

Finished the long front wall of the main building first and then the upper wall and cupola.

Nearing completion.
Upper walls in place. Now just the roof.

Before adding the roof I wanted to complete all pieces of the overall structure. Honestly, I wasn’t looking forward to the roof as all subassemblies except the office had steel roofing. If you have ever done Evergreen steel roofing you know that all the individual raised seems of the roof have to be glued in piece by piece.

Next up was the office. Basically kitted this one. Laid out and cut the walls and a center support. Cut out doors and windows and then assembled.

Office walls cut out and ready for assembly.
Corner bracing added. Decided to add a center piece for support.
Office assembled.

Did add the roof to the office right away as it would be shingled.

Office complete, not planned, but ended up with some nice sags in the roof. Will look it’s age once painted and weathered.

As noted above for some reason I ended up with some sags in the roof. Was going to redo it but it occurred to me that it would add character and give an impression of age. So I left it as is and I hope that after the shingles are added it will still be noticeable. Also visible is the internal braces in the corners. I was trying to keep everything square. This is common for all structures.

After the office I built the transition building. The tall narrow structure with the sloped roof. For some reason I never stopped and took a picture of it’s construction.

Then it was on to the last piece. For lack of a better term, the warehouse. The assembly procedure was pretty much the same as the previous pieces.

The warehouse section glued together.
Top view of the warehouse building showing the bracing used to keep it square and from bowing. Typical of all structures.

So with everything assembled (except for the roofs) this is what it’s going to look like when done.

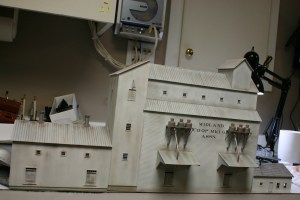
Overall structure basic assembly complete. All sections except the office will have steel roofing. The office will have a shingled roof.
Alternate view of the overall structure. The grain bin is from Rix products.

The Rix grain bin is their tall bin with three extra sections added. The bin is hard to see in the original image of the structure. I went with one this high based on a image of a different complex.

And then it was time for the steel roofing. It took me a couple of nights of work to get them all done, but I did it. After I had the roof on the main section I also built and fitted the dust collectors to the side of the building. This also included the loading pipes and small roof sections added for protection from the elements.

Loading shelter roofs, steel roofing, loading pipes and dust collectors in place.

This is what it looks like with all the roofs in place.

Overall structure with the main detail pieces in place.
Alternate view of the structure.

The long pipe between the Transition building and the grain bin was again based on an image of a different complex. Also added L girder bracing to the bin based on what I have seen out in the field. I am amazed that no one has ever included this in their kits, as all bins that I have seen have it. I have to image that it adds additional bracing to the lower part of the bin because of the added pressure of weight in this area.

Well that’s it for this week. From here its off to the spray booth.

Till next time, Happy Railroading…


Workbench Wednesday 2 …

For this edition of Workbench Wednesday I’m going to walk you through the start of a project to fill the part of the backdrop behind the town of Jackson. Why, do you ask, am I so fixated on Jackson. Well, the answer to that is it’s right behind me when sitting at the workbench and every time I turn to look at the layout, there it is. Just screaming – complete me.

I have been having a problem trying to find the right industry/industries to fill this space. In the original plan from the Model Railroader magazine this space had stock pens and feeder barns. These were used to feed, water and rest cattle  per government regulations. Though I could have recreated it, Jackson is to close to the New Brighton stockyards to warrant them.

So, I’ve got a hole to fill. See below:

The space I need to fill. Backside of tracks along the backdrop where the lumber sheds and grain silos are .

I have been floating a lot of different buildings that I had on hand trying to find the right thing for the space. But nothing seemed to work. Started looking online at images of mid sized Midwestern towns and one of the things that jumped out was that many of them had multiple grain complexes. I didn’t want to just throw another basic grain elevator into the scene, so I googled images of grain elevator complexes and found one I liked.

The inspiration.

I loved the looks of this one, but I was definitely going to have to scratch build it. After looking at the image for awhile I noticed that the central portion looked like any kit grain elevator turned sideways and stretched out.  Thought about buying a couple of kits to reproduce this portion of the building but figured that would be too expensive. Probably spent as much on supplies, but had a whole lot more fun.

I used known dimensions (door height is normally 81″ for example) and using measurement from a kit grain elevator on hand, I worked out the general proportions of the building. It would not be full depth as it had to fit between the track and the backdrop. I then drew up a template for the end wall of the main section.

Basic sketch up for the main building.

Drawn to full depth, the second line on the right is where it would be cut off for the backdrop. I decided that the main elevator section and the office would be clapboard siding and the other two sections would be vertical board siding. Off to the LHS and picked up what they had and got started. The end walls were approximately 12′ high, unfortunately the plastic sheets were only 8″ high, so splicing was involved.


First pieces cut and glued together for the end wall.
First pieces cut and glued for the end wall. Windows in place to check fit.

I then cut the other end, with these two pieces cut I was able to start assembling the main building. It should be noted that the structure in the photograph is street side. After looking at images of other buildings like this I came up with what I thought was a plausible track side configuration. The long side walls have a couple of track side dock doors as well as piping for loading the rail cars.

Main building nearing completion. I used a lot of bracing for the walls.

As noted the side walls were rather flimsy, so I braced them or rather over braced them rather well. A this point I had used up all the clapboard siding that I had on hand. I added the upper back wall using plain styrene as it would not be seen.

Work continues on the main building.

The building in the picture has two structures on the roof of this section, I decided to add only one.

And for now this is where I will have to leave you. I ran out of siding and was unable to go any further. I have already placed an order with Walthers (walthers.com)  and should have it pretty quick.

Till next Wednesday, hope all is well and Happy Railroading…


Workbench Wednesday…

For this first edition of Workbench Wednesday (formally know as “on the workbench”) I will present a couple of of the farm scene kits.

First up is a kit by Monroe Models (www.monroemodels.us). It is their kit #2211, Bob’s Barn. Very simply, loved this kit. The fit was first rate and everything scaled out right. I initially chose this kit because of the footprint size. The width and height were pretty standard when compared to other kits on the market. It was the depth that caught my eye. It was about a third shorter than the others. Which was perfect as the scene isn’t that deep and I would’ve had to shorten it.

All of the trim (corners of the building, window trim, fascia boards, etc. we’re the proper width and gives the building the proper proportion. The white metal castings are pretty flash free and required little cleanup. The instructions are clear and the order of construction seemed reasonable. I did vary as they have you do painting before assembly and I prefer to do it after the walls are together.

When glueing the walls together I added additional bracing on the inside. This was done to combat warping that can result when painting the wood walls. After the walls and roof assembly were glued together, I painted it barn red. Then the trim work was added and painted. When that had dried the peal and stick shingles were added.

Just a side note, I wish / hope that in the future Monroe Models will sell the shingles separately. It would make doing this on scratch built structures faster and easier.

Below is a shot of all the structures together.

The farm scene buildings sans farmhouse

I left the hayloft doors and the side door (out of view) open to add a little interior detail.

The next kit is from Laser Art Structures by Branchline Trains (www.laserartstructers.com). 

It is their kit number #651 Outbuildings farm set. There are 5 buildings. A small barn, equipment shed, smokehouse, chicken coop and outhouse. This kit is out of stock everywhere, with no known restock date. Walked into my LHS and he has the entire line in stock including this one that I had been searching everywhere online for. I guess it pays to support the locals before looking elsewhere.

I was a little disappointed with the kit initially. After thinking about it, that was mainly because I had done the other first. The wood for the walls is thicker and the laser detail not as fine. Because of the thicker walls the corner trim is wider. It scales out at about a foot wide. A little wide for corner trim. Also, the window trim is about as wide, definitely too wide for window trim. And the lengths were a bit short. Found myself adding to get things covered.

The kit has black, lightweight construction paper to use as tarpaper roofing. Luckily I had enough shingles leftover from the other to use on most of these buildings. The small barn got the tarpaper roof, which to me didn’t matter as I don’t plan on using it in the scene. Otherwise, the rest got the shingles which ties all the buildings together.

The last is Walther’s Concrete Silo (www.walthers.com)

It is their kit #3332. Nothing new here, it is their usual high quality and goes together easily.

One thing I still need to find is a proper farmhouse. It’s not that there aren’t any out there, just not what I’m looking for. I’m trying to recreate my grandparents farm on my moms side. The farm my father grew up on was a huge affair and wouldn’t fit the scene. My mothers was much smaller and fits the scene right. To this end I need a smaller house than I’m finding.

All in all, I’m happy with what I have.

Till next time…


On the Workbench #6…

While doing the big “cleaning of the workbench” I had to do something with all the kits I had stacked waiting their turn to be put together. Most were either more work then I wanted to do right now or weren’t relevant at this time. There were a handful that didn’t need a lot of work and were relevant, were involved but relevant or just something that sounded like fun.

First were the water towers for the towns of Jackson and Brandon. I had bought these when I was in Milwaukee from the Walther’s store. They were half price so I had picked up two. When I had opened them up when I got home I found that the reason they were half priced was because most of the wire cross bracing between the legs had fallen off. No problem, I cleaned off the old glue, glued back the pieces that were still in the package, cut new wire pieces for those that were missing and painted all the wire pieces silver. Then I added lettering. The finished towers…

Jackson’s water tower repaired and lettered.
Brandon’s water tower repaired and lettered.

Next up was the “Silver Plume Bakery” by Banta Model Works (bantamodelworks.com). My plan is to use it as… a bakery, in the town of Brandon. I got it because finding single story retail kits for a business district is hard. Most are two or more stories high. Not the thing for a small town. Plus the building has character. Being a laser cut kit I kind of expected the thing to fall together as that has been my experience with this type of kit. Not the case here. I would not recommend this kit as I had to do a lot of adjusting, filing and filling, plus a little scratch building to get the kit to work out.

I thought that maybe it was just me or perhaps this one kit, but I was watching Gerry Leone (bonavistarailroad.com) on MR video Plus and he was using the same kit as a hardware store and had different issues, but as troubling. I don’t know if it’s this one kit or their entire line, just be aware that you might have troubles with this line.

That said, I did get it almost all together. I made a counter and a display case for the retail portion of the store as it has huge windows and screams for some type of detain. I went online and found a wallpaper print typical of my time period and printed it out for the store. All that is left is a couple of chairs for the local clientele, lights and something to put in the display case (a picture of bakery delicacies) and then add the roof and it will be ready.

Bakery interior.
The bakery with the interior and wallpaper installed.
Another view.

Last up was a Russell Snowplow, A Walther’s Kit (walthers.com). Pretty straight build, it has a fresh paint job on it. I’m not sure if a will leave it that way and show it receiving maintenance on one of the short tracks in the roundhouse or I will weather it and have it sitting outside waiting for winter. It could come down to how much time I have.

One of the many projects finished.

I have the road name on but have to come up with the other MOW markings.

That’s it for now, Till next time…